Restoration of VIKING Rusty Sword - RAGNAR Approved
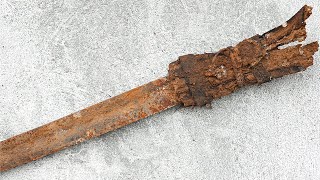
Hello, today is the restoration of the Viking sword. This sword, I understand, is probably a replica of the 20th century, but it looks great. I've been looking for this type of sword for a long time to restore, and now I've finally managed to acquire it. The condition is not average, there is deep rust, corrosion, missing handle, pommel and guard. But I'm going to fix it now.
It was a very difficult project that took me over two weeks of time.
First, I removed the part that was in place of the handle and cleaned the surface with an iron brush from rust. Next, I put a rust remover in the blade, and the next day I took it out. The acid was neutralized using warm water and baking soda. I carried out manual sanding of the blade surface, but light sanding using 120 to 600 grit sandpaper.
To create the guard, I initially used one piece of metal with an interesting engraving, but for some reason it broke after the heat. If you know why, please leave a comment. Next, I used ordinary iron, heated it, and forged it into the desired shape on an anvil. After that, he drilled a hole under the shank of the sword and began to shape it with a hammer.
After creating the guard, I started making the pommel. I originally wanted to make the pommel out of different stripes, as the Vikings originally did. Made of a strip of copper and a strip of steel. But the pommel turned out to be very heavy. So I used another piece of metal, which I split in half. I shaped it and welded it between steel and copper using copper solder and borax.
After processing and shaping the desired shape, I drilled a hole in the middle for the shank of the handle. And he began to stretch the shank of the sword by heating it. I loosened the shank to the desired length and moved on to the design of the pommel and guard. For the decoration, I used engraving, as well as cutting brass and copper wire. After completing the design of the parts, I darkened them in a 10% nitric acid solution.
I chose dry beech wood for the handle itself. But it was possible to get the right handle shape only the third time. After cutting out the desired shape, I used an additional brass rivet, as well as epoxy resin mixed with iron and sawdust. After drying, I shaped it with a file and sandpaper. As needed, I wrapped the handle surface with leather straps for an improved grip and covered it with thin leather.
I wrapped a nylon thread around the top in order to give a certain leather texture. Next, I started creating the scabbard, which is made of dry wood. Having cut out the desired shape, I glued them together and proceeded to processing.
After shaping the scabbard, I added leather straps for hanging, glued them together, and glued thin black natural leather over it, and stitched the scabbard with a waxed thread soaked in beeswax. After working with the scabbard, I made additional accessories from nickel silver, and also added a beautiful brooch to the sword scabbard for decoration.
As usual, I conducted an interesting test for you. Please share this video. Thanks for attention.
Sincerely, Alex. Thanks for attention!
Good luck and health to everyone! With best wishes, Alex!
Please subscribe to my channel: @ScrewsAndTools
🍖 My New Cooking channel! @screwsandtoolscooking
Patreon: https://www.patreon.com/Screwsandtools
Paypal: paypal.me/screwsandtools
Facebook: https://www.facebook.com/scresandtools/
Instagram: https://www.instagram.com/screwsandtools/
#screwsandtools #sword #restoration

 22:57
22:57
 23:34
23:34
 25:59
25:59
 26:13
26:13
 36:55
36:55
 33:16
33:16
 26:11
26:11
 22:11
22:11
 46:57
46:57
 1:00:01
 25:32
25:32
 22:54
22:54
 25:29
25:29
 1:15:36
 22:25
22:25
 39:09
39:09
 47:13
47:13
 1:00:00
 35:50
35:50
 34:26
34:26


