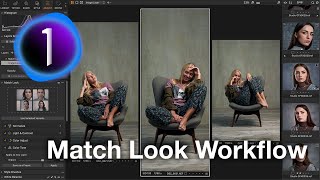
Capture One Match Look: Creating the Perfect Workflow
Match Look is a new tool introduced in Capture One 16.5 and it has been the subject of much debate - with some calling it a game changer and others claiming it doesn't work at all.
In my view, Match Look is a fantastic tool, but its potential is often misunderstood. Today, we’ll break down how it’s designed to be used and how you can get the most out of it.
This video is a part of Deep Dive into Match Look and AI Masking Course - https://alexonraw.com/capture-one-course-deep-dive-into-match-look-and-ai-masking/
Match Look Basics
First, let's explore all the capabilities and limitations of this new tool.
Match Look is designed to replicate the color grading of a reference image. Just set any image as a reference, it can be your RAW file or just a JPEG from the Internet, and apply it to your image. You can use up to 20 images as references, but I don't recommend it, usually I use no more than 4 reference images. Otherwise, the Match Look output becomes less stable and less predictable.
You might think that using Match Look is the same as copying adjustments, but in fact in most cases the resulting adjustments will be different. It is the look that will be the same. To illustrate this difference, let's take an image with a cool color grading and copy its adjustments to another image, just as we usually do. Note that there is only one tool to copy - Color Balance. As you can see, the same adjustments work differently on this image, creating a distinct look.
Now I'm going to set the original image as a reference in the Match Look tool and apply this reference to the new image. We have got a much more similar look, and the Match Look tool achieved this by adjusting a whole bunch of additional tools: White Balance, Exposure, HDR, Levels, Curves, Color Balance, and even Color Editor.
That's why Match Look is not a replacement or alternative to copying adjustments. In fact, most of the complaints I have seen about Match Look are related to this basic misunderstanding. People treat Match Look as if it were copying adjustments, but it's a completely different process.
Now, let's overview all the Match Look settings.
First of all, you can apply the Match Look color grading as a layer, and I strongly advise you to do this all the time. The thing is that you can adjust the opacity of this layer and change the effect of the match look corrections. So if you feel that the Match Look is too strong, you can easily make it less pronounced.
By the way, Match Look creates a regular layer, so you can easily erase or redraw it as needed. For example, here I want to return to my original background and I can quickly remove that part of the mask.
Now that we know all these features, let's try to find the right Match Look workflow to get the most consistent result.
If your images were taken under different conditions - you are free to apply Match Look to all of them at once. Copying image adjustments won't help you anyway, so Match Look is the only tool you can use here.
However, if you are editing images taken in the same or similar conditions - adjust only the key image, then copy and apply adjustments as usual.
Match Look is primarily an inspiration tool. It lets you quickly find a look that works best with your images. But you don't have to apply it to all your images; good old-fashioned copying and pasting is much more reliable and consistent. Let's take these images - they were taken in one session with the same camera settings and lighting.
All I need to do is find a nice look for the first image in the series, like this one. Now copy those adjustments and apply them to all the other images, and you'll have a perfectly consistent look.
 25:43
25:43
 15:11
15:11
 7:23
7:23
 13:06
13:06
![FREE photo editor tutorial - SIMPLIFIED darktable workflow! [darktable v5.0.1]](https://i.ytimg.com/vi/ZUc6LOzg_Nk/mqdefault.jpg) 55:54
55:54
 9:38
9:38
 10:28
10:28
 25:32
25:32
 7:48
7:48
 26:30
26:30
 15:31
15:31
 15:32
15:32
 18:50
18:50
 19:35
19:35
 5:40
5:40
 18:02
18:02
 15:04
15:04
 14:59
14:59
 23:23
23:23
 11:03
11:03


