Woodturning | Making pens with stone and glass Inlays
Come check out our brand new shop launch! https://formanwoodworking.com/
_____________________________________
Check out my Instagram! https://www.instagram.com/formanwoodworking/?hl=en
_____________________________________
Today's video:
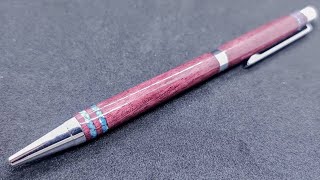
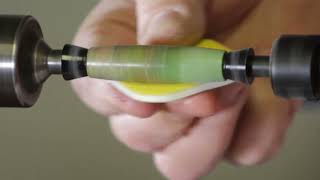
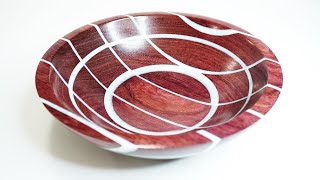
If you're like me, you find inlays gorgeous, especially when they're done well, and as with most things I find interesting, I always want to try them out with pens! For these three, I decided to make two from maple (the lighter coloured pens) and one from jatoba. To start, I began making these pens just like I would with any other; I first cut the blanks into two pieces, drilled a hole through each one on the lathe, and glued the brass tubes inside with some medium viscosity CA glue. After letting the glue fully cure for 24 hours, I trued up the ends of the wood blanks to the brass tubes and then slid them onto the pen mandrel. Next, I turned the blanks down to approximately 95% of their finished shape (the reasoning behind this was to allow for just a tiny bit extra material as a safety net, just in case I needed to reshape any part of the blanks once the inlays were completed). I then used my parting tool to turn out circular channels in the wood. For this part, you definitely need to be careful with how deep you go, as you don't have any nearby bushings to guide you depth-wise. Thankfully, I never hit any brass. I then mixed up some blue stone, black stone, and pink/white glass in some 5-minute epoxy from Gorilla Glue and tried my best to fill the freshly-cut channels. As you can probably imagine if you've watched the video, this was by far the most difficult part of the project. Usually when you're making inlays, you're dealing with flat, or nearly flat, surfaces, but with these channels being perfectly circular, it was a huge challenge to get them evenly filled all the way around. I thought the fast curing resin would make this challenge much easier, but "5-minutes" really needs some context. It may be a 5-minute working window, but it probably took closer to 20-30 minutes for the epoxy to set up enough that I didn't have to babysit it (otherwise, everything would fall out). I again let the pens sit for 24 hours, just to be sure the epoxy had fully cured, then sanded the inlays flush with the rest of the wood. From here, I added a CA finish with a thin viscosity glue, wet sanded up to 12000 grit, and polished with some plastic polishing paste.
If I were to do things differently:
Putting the challenge of filling the inlays aside, I think the only thing I would have done differently for this project was to make the inlays slightly wider. For the two stone pens, I made the inlays just the width of the parting tool, and I did double that for the glass pen. These ended up being quite narrow, and I had a bit of a hard time actually getting the stone and glass into the channels I'd cut. I think if I'd turned them a little wider, I could have had more material in the inlays, and I think that would have given the pens an even better look. Something to try out next time!
Key equipment/products I used:
Rikon 70-220 VSR Midi Lathe: https://www.leevalley.com/en-ca/shop/tools/power-tools/lathes/101468-rikon-70-220vsr-midi-lathe?item=03J7320
Pen Mandrel: https://www.amazon.ca/gp/product/B004H6GIPY/ref=ppx_yo_dt_b_asin_title_o05_s00?ie=UTF8&psc=1
Woodstock 1/2 inch bowl gouge: https://www.amazon.ca/gp/product/B005W139CS/ref=ppx_yo_dt_b_asin_title_o04_s00?ie=UTF8&psc=1
Ballpoint pen kits: https://www.penblanks.ca/Budget-Streamline-Flat-Top-ballpoint-pen-kit-chrome/
Pen Blank Chuck: https://www.amazon.ca/gp/product/B07CKTCX4W/ref=ppx_yo_dt_b_asin_title_o01_s00?ie=UTF8&th=1
Pen Press: https://www.amazon.ca/gp/product/B005QU98G6/ref=ppx_yo_dt_b_asin_image_o01_s01?ie=UTF8&psc=1
Music provided by Epidemic Sound
Dancing on a Memory - Hallman
Sun is Shining - Tomas Skyldeberg
Vegas - Onda Norte

 28:46
28:46
 26:33
26:33
 7:13
7:13
 11:15
11:15
 17:06
17:06
 15:49
15:49
 18:07
18:07
 41:19
41:19
 11:43
11:43
 17:17
17:17
 11:40
11:40
 5:38
5:38
 44:18
44:18
 11:41
11:41
 16:58
16:58
 14:00
14:00
 18:05
18:05
 1:52:09
 9:03
9:03
 12:58
12:58


