🔥Level Up Your Art With The MOST Complete Affinity Brush Bundle:
https://iamrensi.kit.com/products/ultimatebrushbundle 👉 Join my FREE Skool community for Affinity Photo Creatives: https://www.skool.com/affinity-photo-creatives-6824/about
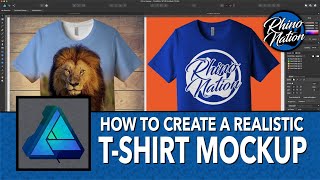
In this tutorial I show you the best way to create RE-USABLE MOCKUPS in Affinity Photo. You will learn how to realistically place and embed any image onto a textured surface using several adjustment layers (Levels, Hue, Gaussian Blur) and the Displacement Live Filter.
After you're done you can swap out the embedded image without having to repeat all these steps everything time and time again (similar to Smart Objects in Photoshop).
00:00 How To Create Re-Usable Mock Ups
00:18 Create Embedded Document
02:07 Black Friday Special
02:53 Realistically Place Image onto T-Shirt
07:47 Swap Out Embedded Image
FREE AFFINITY ASSETS:
⚡️ Instantly add realistic elements to your photos - Try The Ultimate Brush Bundle for FREE:
https://iamrensi.ck.page/free-brushes
🔥 FREE Cheatsheet - Most Used Affinity Photo Keyboard Shortcuts:
https://iamrensi.ck.page/workflow-booster/
GIVE SOME LOVE TO IAMRENSI:
❤️ Appreciate what I'm doing? Thank me with a donation!
https://iamrensi.ck.page/products/thankyou

 13:19
13:19
 15:12
15:12
 13:57
13:57
 9:17
9:17
 23:26
23:26
 14:18
14:18
 12:46
12:46
 8:17
8:17
 13:25
13:25
 10:44
10:44
 1:28:14
 26:41
26:41
 12:12
12:12
 14:00
14:00
 8:13
8:13
 23:18
23:18
 19:42
19:42
 10:52
10:52
 27:00
27:00
 14:55
14:55


