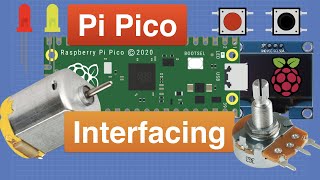
Let’s hook up some common components to the new Raspberry Pi Pico and see how to code for them in MicroPython!
Detailed Article with Code downloads: https://dronebotworkshop.com/pi-pico/
More articles and tutorials: https://dronebotworkshop.com
Join us on the forum: https://forum.dronebotworkshop.com/
Subscribe to the newsletter and stay in touch: https://dronebotworkshop.com/subscribe/
The Raspberry Pi Pico is the first microcontroller produced by the Raspberry Pi Foundations, and they even designed the MCU for it. It has a wealth of features and a budget-friendly 4-dollar price tag.
With all of the hype around the Pico since its announcement a few weeks ago I wanted to actually DO something with it. So I decided to hook up a few simple I/O devices to it and see how to code for them using MicroPython.
I did all the coding on the Thonny IDE, and to keep things in the family I used a Raspberry Pi 4 as my host computer. You can also use Thonny and the Pico with Linux, Windows, and Mac OS X workstations as well, but it’s already installed and ready to go with the latest Raspberry Pi Operating System release.
All of these are basic I/O experiments with very simple code, but they each illustrate a useful technique that can be applied to other I/O devices. Plus, if you’re not familiar with MicroPython, it will help you ease into it, as all of the code is very elementary.
For those of you who are put off by the need to solder your own Pico pins fear not, I’ll show you just how easy it is. I'll even give my Pico a bath after I finish soldering it!
Here is what you will see in today's detailed look at the Raspberry Pi Pico:
00:00 - Introduction
03:17 - Raspberry Pi Pico
12:02 - Pico Soldering
19:15 - Set up Thonny IDE
23:36 - LEDs and Switches Intro & Hookup
26:12 - RGB Blink Demo
28:55 - Switch Test
31:36 - Interrupts & Toggle Demo
36:09 - LED & Switch Demo
37:42 - Analog Input Intro & Hookup
38:59 - Analog Input Demo
42:32 - LED PWM Demo
44:26 - OLED Display Intro & Hookup
45:49 - Display Demo
49:13 - Motor & H-Bridge Intro & Hookup
51:21 - Motor Demo
54:37 - The Everything Demo
58:05 - Running Programs at Boot-up
1:00:42 - Conclusion
It will be interesting to see what the future holds for this cute little microcontroller. It has some very nice design features but it also faces a lot of competition from devices like the Seeeduino XIAO, Arduino 33 IoT series, and, of course, the ESP32 boards.
But as I just received a big bag of Pico accessories, with more on the way, you're sure to see the Pico here in the workshop again very soon!
Hope you enjoy the video, if you want to discuss it in detail there is a dedicated thread on the forum at https://forum.dronebotworkshop.com/2021/raspberry-pi-pico-control-the-i-o-world/
 42:47
42:47
 36:08
36:08
 18:48
18:48
 4:03:45
 1:52:44
 1:01:39
![[#1] Raspberry Pi Pico - Zapoznanie i pierwsze programy w MicroPython](https://i.ytimg.com/vi/DSly6Yq-eM4/mqdefault.jpg) 22:54
22:54
 20:40
20:40
 23:37
23:37
 15:53
15:53
 17:19
17:19
 49:26
49:26
 40:21
40:21
 47:57
47:57
 15:24
15:24
 17:13
17:13
 27:27
27:27
 16:16
16:16
 50:22
50:22
 1:20:13


