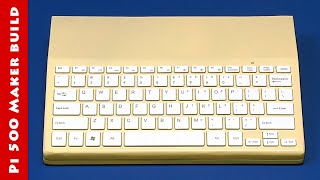
Raspberry Pi 5 fitted in a custom-built keyboard case, with internal M.2 SSD and full-size HDMI connector. And painted the colour of an Amiga 500!
My initial review of the Raspberry Pi 5 is here:
https://www.youtube.com/watch?v=9hYfQ7bRgZg
And the video in which I did my first Raspberry Pi 5 cooling tests is here:
https://www.youtube.com/watch?v=35_5wRKi_TI
Finally, my “Ultimate Raspberry Pi 4 Rig” video is here:
https://www.youtube.com/watch?v=HIYZwsc19CU
The Pi 500 keyboard case was constructed using the following materials and parts. Note that all links are affiliate to Amazon UK, and that I may earn a commission from any purchases you may make.
3mm ABS plastic sheet, sometimes known as “plasticard”. Specifically, for most of the parts I used: https://amzn.to/3SCwjXH
The ABS sheet was glued together using Humbrol liquid cement: https://amzn.to/3MJ7qWz and filled with Humbrol model filler: https://amzn.to/3u8LduO
The keyboard I used was this one: https://amzn.to/40xlGY4 – and do note that it is very hard to take it apart and put it back together without breaking anything. This is sometime to attempt at your own risk!
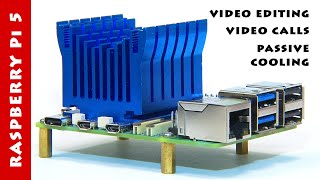
The USB extension cables were these: https://amzn.to/3stsutm The Ethernet extension was this: https://amzn.to/49yVKzk The micro to full-size HDMI extension was this: https://amzn.to/49p17kG And the USB-C power extension was this: https://amzn.to/47vjQtk
For additional ExplainingComputers videos and weekly updates, you can learn about becoming a channel member here: https://www.youtube.com/channel/UCbiGcwDWZjz05njNPrJU7jA/join
More videos on computing and related topics can be found at:
http://www.youtube.com/@explainingcomputers
You may also like my ExplainingTheFuture channel at: http://www.youtube.com/@explainingthefuture
Chapters:
00:00 Introduction
01:00 And so it begins (parts & materials)
04:46 On the Case (initial construction)
07:28 Fit Test
10:58 All Finished
14:45 Wrap
#Pi500 #RaspberryPi5 # #ExplainingComputers
 14:59
14:59
 19:59
19:59
 31:14
31:14
 27:38
27:38
 16:55
16:55
 23:34
23:34
 30:22
30:22
 20:09
20:09
 21:18
21:18
 17:24
17:24
 15:46
15:46
 27:48
27:48
 16:12
16:12
 28:23
28:23
 21:14
21:14
 22:02
22:02
 27:27
27:27
 17:31
17:31
 18:56
18:56


