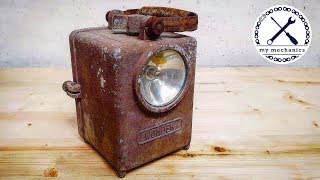
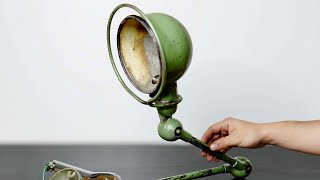
In today's video, we’ll show you the renovation of an old rusty table lamp.
I got my lama from my friend for renovation - the condition was yellow color :)
The body of the luminaire (corpus, montura) is a mechanical base of the whole luminaire, it is used for mounting on a wall or supporting structure. It carries the other parts and is fitted with all the electrical equipment.
light source can be bulb, fluorescent, discharge lamp, LED. It is easily replaceable thanks to the standardized base.
The cover is usually transparent or translucent, easily removable, but in our case full metal, it works more like a shield. Sometimes only in the form of a grid or decorative lampshade. Mechanically protects a fragile light source. It improves light distribution and is the most striking part of the luminaire design.
Depending on the light source used, the luminaires are divided into:
filament lamp with incandescent lamps, halogen lamps or low-voltage halogen lamps
fluorescent lamps with linear or compact fluorescent lamps
discharge lamps with metal halide, sodium or mercury lamps
LED diode. (Wikipedia source)
action index:
00:01 showing the original state of the lamp
00:29 first it was necessary to grind the lamp cover rivets
00:53 using a screwdriver, I removed the cover
01:05 To unscrew the bottom Bakelite cover, I unscrewed the bulb
01:42 To completely remove the bakelite cover, it was necessary to unscrew the electrical cable holder
02:43 for easy disassembly I cut off the old old cable, which I intend to replace for safety for a new one
02:59 After removing the center nut, the lamp was finally broken
05:15 I cleaned all the metal parts of the lamp roughly with a wire disc
06:14 to a place where a large wire disc did not get I used a hand drill with a small wire disc
06:34 P180 sandpaper was used for final cleaning
07:23 The lamp holder had to be leveled with a hammer
07:40 I treated all cleaned metal parts with a rust remover
08:26 After the rust remover has dried, clean the remainder of the rust remover with a metal wool
09:23 apply primer
09:33 after the primer has dried, the unevenness that I filled with P360 spray putty has been shown
10:10 regrind the hardened putty with water sandpaper with a roughness of P1000 and higher
10:40 I applied the top synthetic paint on the perfectly smoothed surface
11:20 on the connecting piece I released a color imitating chrome
11:35 Finally, it was left to clean the lamp socket, because it is porcelain, so cleaning with a metal brush did not hurt the socket in any way
12:10 as well as bakelite parts
12:44 I applied white color to the inside of the lampshade after curing the top yellow color for better light reflection
12:54 I glued silicone wheels to the bottom of the lamp for better stability
13:30 and assembly can begin :)
14:40 done :) followed by a test :)
15:06 comparison before and after renovation
If you want to support me in making new videos, you can make any small amount on PayPal Thank you: https://www.paypal.me/VeradonaRestoration
My Patreon Page: https://www.patreon.com/VeradonaRestoration
My PayPal:
[email protected] 
 21:33
21:33
 35:44
35:44
![What's in the box?! 1890s Safe [Restoration]](https://i.ytimg.com/vi/kugqGatwLDY/mqdefault.jpg) 20:44
20:44
 17:42
17:42
 19:13
19:13
 22:53
22:53
 19:58
19:58
 15:35
15:35
 25:47
25:47
 20:52
20:52
 30:52
30:52
 23:51
23:51
 26:09
26:09
 25:44
25:44
 22:11
22:11
 14:44
14:44
 15:48
15:48
 33:58
33:58
 20:35
20:35
 22:02
22:02


