In this second video tutorial about simple microcontrollers, we get a bit more logistics focused by going over what parts you will need to follow along with these PIC10F200 tutorials and why. It'll be good to get this stuff headed your way so that once we start actually turning on LEDs and controlling motors, you're not sitting around waiting for parts. We recommend checking out the written tutorial on CircuitBread so that you can review the parts list more easily - https://www.circuitbread.com/tutorials/equipment-for-our-simple-microcontroller-tutorials-pic10f200-part-2
If you find this interesting, subscribe to CircuitBread for more videos on microcontrollers and other beginner and intermediate electronics!
Table of Contents:
0:00 Introduction
0:23 You'll need the microcontroller - PIC10F200 (preferably in a DIP package)
0:56 Compatible programmer/debugger (we recommend the PICKit 4 unless you already one)
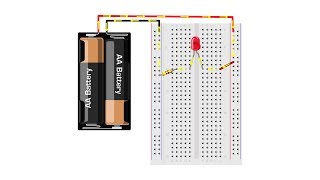
1:50 The electronic components that will go on the bread board
2:39 You'll need a computer and the MPLAB IDE (either MPLAB 8.76 or MPLAB X)
3:40 We'll be doing conceptual videos next but this is a good time to acquire what you need!
For electronics tools, tutorials, equations and more check out our site: https://www.circuitbread.com
And check out our Friends of CircuitBread, who offer special discounts, product samples, resources and more to our users: https://www.circuitbread.com/friends
CircuitBread is joining the fight to help people more easily learn about and use electronics. With an ever-growing array of equations, tools, and tutorials, we're striving for the best ways to make electronics and electrical engineering topics more accessible to everyone.
Connect with CircuitBread:
Instagram ➤ http://instagram.com/circuitbread
Facebook ➤ https://www.facebook.com/circuitbread
Twitter ➤ http://twitter.com/circuitbread

 8:23
8:23
 6:01
6:01
 10:36
10:36
 21:00
21:00
 47:27
47:27
 9:28
9:28
 12:21
12:21
 22:12
22:12
 11:41
11:41
 40:38
40:38
 16:40
16:40
 6:19
6:19
 37:17
37:17
 20:38
20:38
 12:35
12:35
 10:55
10:55
 28:43
28:43
 28:43
28:43
 22:14
22:14


