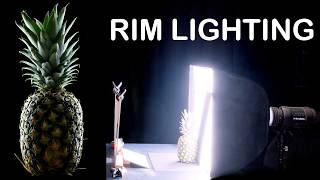
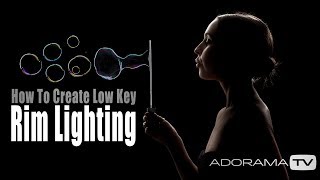
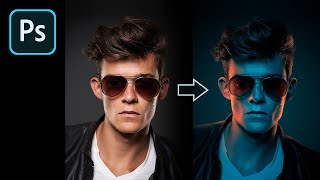
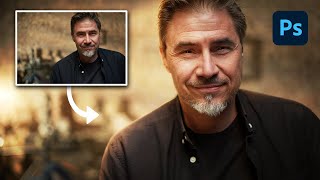
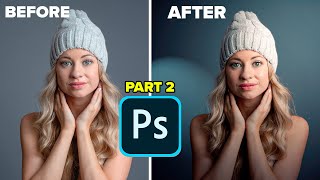
Unlock the secrets of creating a stunning rim light effect in Photoshop. Join me as I walk you through the step-by-step process of adding a captivating rim light to your subjects. Discover how a rim light can provide excellent separation from the background and give your images a three-dimensional finish. While using an actual light source is ideal, there are situations where it may not be feasible, as demonstrated in the case of photographing a horse. In such cases, I'll show you how to recreate the rim light effect in Photoshop, allowing you to achieve a similar result. With precise techniques and expert guidance, you'll learn how to manipulate lighting, enhance the subject's presence, and create a visually striking impact. Whether you're a photographer, a digital artist, or simply passionate about creative editing, this tutorial empowers you with the skills to bring your vision to life. Don't miss this opportunity to master creating a rim light effect in Photoshop and take your images to new heights!
LINKS:
Tog Pro Holidays: https://www.togproholidays.com
Workshops & Blog: https://togpro.com
MY ONLINE COURSES, PRODUCTS & MEMBERSHIPS:
The Master Collection Lightroom preset pack - https://togpro.com/Adobe-Lightroom-Pr...
The Beginners Masterclass - https://togpro.com/beginners-mastercl...
Tog Pro VIP, access all my training material - https://togpro.com/vip
WHO AM I:
I'm James, a fashion photographer from the UK. I'm also a mentor to other photographers, from beginners to professionals. I run photography holidays, workshops, and a private membership group with training and mentoring features.
GET IN TOUCH:
Feel free to email me at
[email protected] I will try my best to reply.
00:00 Introduction
00:23 Isolate the subject from the background
01:59 Add rim light effect
03:00 Unselect the chain from the curves adjustment
03:17 Move the adjustment layer to reveal the effect
03:41 Add the rim light effect to the other side of the image
04:07 Feather the rim light effect
04:54 Refine the rim light effect

 12:23
12:23
 15:56
15:56
 22:34
22:34
 15:34
15:34
 8:04
8:04
 33:54
33:54
 9:26
9:26
![Apply Rim Light In Photoshop [Pro Hollywood Technique Revealed!]](https://i.ytimg.com/vi/H-z0j2jVka8/mqdefault.jpg) 15:57
15:57
 20:29
20:29
 1:26:55
 21:35
21:35
 10:33
10:33
 24:31
24:31
 16:33
16:33
 7:15
7:15
 4:38
4:38
 12:13
12:13
 8:10
8:10
 16:31
16:31
 2:22
2:22


