Here's how you create cinematic, organic, and visually stunning motion graphics that truly stand out. Download my FREE Guide to Mastering Cinematic Motion Design → https://motionscience.tv/guide
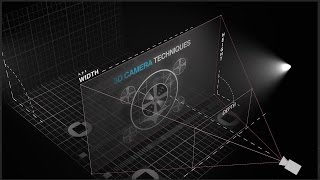
In this tutorial, Cameron from Motion Science walks you through the process of creating 3D depth in After Effects. Learn how to utilize 3D lights, cameras, and photography to achieve a dynamic depth effect in your motion graphics. Cameron also introduces the concept of film emulation with dehancer and demonstrates how to animate elements like strings to guide the viewer's eye.
Dehancer Pro Film Emulation: Save 10% on Dehancer with code MOTIONSCIENCE
Join my Motion Science Membership to get instant access to my courses, workshops, and community. Click to start: https://tinyurl.com/mrxn784s
Level Up Your Looks With These Texture Packs:
https://bit.ly/filmtextures
https://bit.ly/grungepack
How I Organize My Creative Ideas:
https://bit.ly/workflowynotes
The Music I Use:
https://bit.ly/epid-sound
Follow Motion Science:
Instagram: https://www.instagram.com/motionscience
Pinterest: https://www.pinterest.com/motionscience
Website: http://www.motionscience.tv
Introduction to 3D Depth in After Effects (
00:00 -
00:19)
Welcome and Overview by Cameron (
00:19 -
00:45)
Setting up the Composition (
00:45 -
01:19)
Introducing the Texture Layer (
01:19 -
01:37)
Positioning in 3D Space (
01:37 -
02:57)
Adding Photos and Mockups (
02:57 -
03:07)
Setting up the Camera (
03:07 -
03:44)
Adjusting Precompositions (
03:44 -
04:34)
Animating the Camera Movement (
04:34 -
05:12)
Incorporating the String Element (
05:12 -
07:09)
Color Correction and Tinting (
07:09 -
07:26)
Positioning and Layering the String (
07:26 -
09:01)
Adding Lights for Depth (
09:01 -
12:12)
Enhancing with Ambient Light (
12:12 -
14:01)
Film Emulation with Dehancer (
14:01 -
15:09)
Final Adjustments and Tweaks (
15:09 -
17:57)
Conclusion and Final Preview (
17:57 -
18:24)
Closing Remarks and Resources (
18:24 -
18:53)

 16:40
16:40
 3:03:28
 20:47
20:47
 17:49
17:49
 17:57
17:57
 19:04
19:04
 15:22
15:22
 22:39
22:39
 16:46
16:46
 2:56:55
 20:37
20:37
 14:49
14:49
 12:03
12:03
 9:00
9:00
 58:42
58:42
 21:05
21:05
 26:15
26:15
 29:32
29:32
 22:26
22:26
 28:06
28:06


