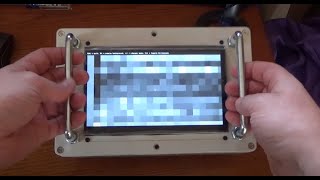
This is a handheld capacitive 2D imager that can "see" into surfaces like walls, floors, furniture, etc! It's kind of like a high-tech stud finder for identifying what's inside your wall!
The original creator of this technique is @optisimon, his video can be found here:
https://www.youtube.com/watch?v=j5DztX6e-d8 and more info is on his website here: http://optisimon.com/raspberrypi/touch/ft5406/2016/07/13/raspberry-pi-7-inch-touchscreen-hacking/
I made some modifications to the code so it would work better as a standalone handheld unit. My write-up and code can be found here: https://saveitforparts.wordpress.com/2021/12/02/handheld-capacitive-scanner-wall-x-ray/
Please note that you need a Raspberry Pi official 7" touchscreen with an FT5406 chip. The newer FT5426 and other chips won't work! I had a very difficult time tracking down this somewhat older model screen!
As a quick overview of some of the steps I took to get this working:
-Installed Rasbian Stretch (newer Rasbian versions didn't work)
-Enabled Full KMS for external HDMI screen
-Followed the Readme files on Optisimon's page for configs etc.
-Changed SDLWindow.hpp column iteration
-Changed zoom level from 40 to 50 in SDLEventHandler.hpp
-Made a shell launch script with xdotool calls for keystrokes
-Added a startup .desktop entry.
(Full writeup is on saveitforparts.com).
 13:36
13:36
 19:18
19:18
 23:40
23:40
 22:27
22:27
 12:39
12:39
 21:20
21:20
 15:16
15:16
 12:13
12:13
 26:02
26:02
 56:40
56:40
 22:41
22:41
 12:20
12:20
 13:23
13:23
 13:51
13:51
 30:14
30:14
 14:25
14:25
 24:56
24:56
 26:36
26:36
 15:16
15:16
 19:45
19:45


